Site-to-Site IPSec VPN between Sophos UTM and Debian using StrongSwan with RSA-Pubkeys


Introduction
This guide will show you, how you can establish a Site-to-Site IPSec VPN between a Sophos UTM Firewall and a Debian 9 "Stretch" based Server using StrongSwan with RSA Public-Key based authorization.
Normally we would use a simple Road-Warrior VPN for single Clients but I wanted to have something persistent for our use-case, so I choose a Site-to-Site VPN (S2S). I've also tried an SSL-based S2S-VPN but that was quite slower compared to IPSec.
The SSL-S2S-VPN performed at about 137Mbit/s while the IPSec-S2S-VPN managed to get up to 280Mbit/s. Both Endpoints are connected with at least 1Gbit/s with each other.
I didn't manage to get more performance out of the VPN, yet, but I'll try to in the future. For my case 280Mbit/s are fast enough for now.
If someone has a clue how to get it faster after reading my guide, let me know in the comments or write me on Twitter.
Lets go.
Setup overview
At first, I'll explain the setup here. Feel free to adapt it. I hope to give enough advice for the configuration later, so you should be able to change it so it fits your needs.
We will have our Debian Server on the left side and since we want to use a Site-to-Site VPN, we also need a subnet on that side. This can be problematic because we only have a single server.
But we can help us out by using a dummy network interface with at least a /32 IPv4-Subnet. On the right side we have our Sophos UTM - I use 9.5 here - that has a real subnet on it's side for the VPN.
See the diagram below because a picture says more than a thousand words.

Preparing the Debian Server
We will start with the Debian Server. At first install the necessary packets.
apt-get install strongswan libcharon-extra-plugins
In the next step we need to generate our local RSA Keypair. The Sophos UTM uses a 4096bit Key, so we will generate the same locally.
I haven't tried to use a smaller key here but since the NIST and BSI won't allow keys smaller than 3000bit after 2022, we will just use the larger keys and be safer and compliant for our VPN.
We need to generate the keys and convert them to DER format for strongswan.
# Create a folder, where we place our keys
mkdir /etc/ipsec.d/rsa
cd /etc/ipsec.d/rsa

# Generate a 4096bit RSA Private Key
openssl genrsa -out privkey.key 4096
# Export private key in DER format for use in StrongSwan
openssl rsa -in privkey.key -out privkey.der.key -outform DER
# Export public key in DER format for use in StrongSwan
openssl rsa -in privkey.key -outform DER -pubout -out public.der
# Export public key in PEM format for later use in UTM conversion
openssl rsa -in privkey.key -outform PEM -pubout -out public.pem
Adding the public RSA key from the UTM
We also need to put the public key of the Sophos UTM in this folder. For that, login to the UTM and on the left menu pane go to Site-to-Site VPN and then to IPsec. On the right side navigate to Local RSA key and copy and paste the key in the sub-tab Current Local Public RSA Key. Save that key and convert it as well (see below).
For conversion we need a tool that first converts our Base64 RFC 3110 RSA key from the UTM to PEM - it's called rsa-converter. Afterwards we convert it to DER format using openssl.
cd /etc/ipsec.d/rsa
vim remote.pub # Insert copied key from UTM and save

# Download rsa-converter
cd /tmp
git clone https://github.com/ryanriske/rsa-converter
cd rsa-converter
# Install rsa-converter dependencies
apt-get install libcrypt-openssl-bignum-perl libcrypt-openssl-rsa-perl libparse-recdescent-perl

# Convert the UTM pubkey to DER format
./rsa-converter -p /etc/ipsec.d/rsa/remote.pub > /etc/ipsec.d/rsa/remote.pub.pem
# Convert key to DER format
openssl rsa -pubin -inform PEM -in remote.pub.pem -outform DER -out remote.pub.der
Configure IPSec settings and secrets
For the configuration we only have to edit the /etc/ipsec.conf file. The /etc/strongswan.conf file defaults are just fine for us. The explanations for each entry is the comment above it.
# Edit /etc/ipsec.conf
vim /etc/ipsec.conf
# Content
config setup
# Only allow a single connection
uniqueids=yes
conn %default
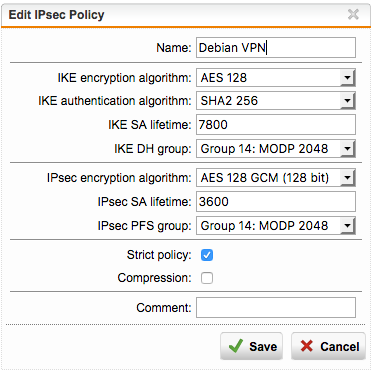
# On the UTM this is "IKE SA lifetime"
ikelifetime=7800
# On the UTM this is "IPSec SA lifetime"
keylife=3600
rekeymargin=3m
keyingtries=1
# We need to use ikev1 because UTM only supports this
keyexchange=ikev1
conn net-net
# Public IPv4 of our Debian Server
left=<DebianPublicIPv4>
# The Subnet behind our Debian Server (change to fit your needs)
leftsubnet=10.0.0.1/24
# The VPN-ID of our Debian Server
[email protected]
# The Public Key of our Debian Server in DER format
leftsigkey=/etc/ipsec.d/rsa/public.der
# Define that we want to use RSA pubkey auth
leftauth=pubkey
# Configure iptables firewall automatically
leftfirewall=yes
# Public IPv4 of our UTM
right=<sophosPublicIPv4>
# The Subnet behind our UTM (change to fit your needs)
rightsubnet=10.1.0.1/24
# The VPN-ID of our UTM**
[email protected]
# The Public Key of your UTM (see conversion above)
rightsigkey=/etc/ipsec.d/rsa/remote.pub.der
# Also configure RSA pubkey auth here
rightauth=pubkey
# Tells StrongSwan to try to initiate the connection
auto=start
# The IKE params we want to use (AES-CBC-128, SHA-256, 2048bit DH)
ike=aes128-sha256-modp2048!
# The IPSec params we want to use (AES-GCM-128 (128bit), SHA-256 and 2048bit DH)
esp=aes128gcm16-sha256-modp2048!
# Enables Dead peer detection and auto-restarts VPN when it detects one
dpdaction=restart
** You can find the VPN-ID of your UTM where you found the Public RSA key. It's the section below called Local RSA Key VPN Options. The ID type should be Hostname and the ID below is what you need to enter here.
Now we also need to add the RSA private key as a secret so we can establish a connection. Edit /etc/ipsec.secrets and add the following content. The important part is at the last 2 lines. Uncomment the include and add the RSA part.
# This file holds shared secrets or RSA private keys for authentication.

# RSA private key for this host, authenticating it to any other host
# which knows the public part.

# this file is managed with debconf and will contain the automatically created private key
#include /var/lib/strongswan/ipsec.secrets.inc
: RSA /etc/ipsec.d/rsa/privkey.der.key
We still need to configure the UTM below, so we will restart the IPSec service later.
Enable IPv4 Packet Forwarding
Now, before we configure the VPN, we will set another kernel parameter that is needed to allow IPv4 Packet forwarding. Since we don't yet have IPv6 on the Sophos-side, we don't need that for now. If you have it, enable it as well.
In the /etc/sysctl.conf uncomment the following line
# Uncomment the next line to enable packet forwarding for IPv4
net.ipv4.ip_forward=1

# Uncomment the next line to enable packet forwarding for IPv6
#  Enabling this option disables Stateless Address Autoconfiguration
#  based on Router Advertisements for this host
#net.ipv6.conf.all.forwarding=1
The part for IPv6 is right below, uncomment it as well if you need it.
In order to enable that feature without rebooting, run the following command.
sysctl -p /etc/sysctl.conf
Adding a dummy interface for our subnet on the Debian server
Since we don't really have a real subnet on the Debian server side, we will add a dummy interface with no real hardware behind it to act as our subnet.
Check that there is a dummy driver available by running:
modprobe dummy # Should exit 0 without output
Now let's configure our new interface for later use.
Edit /etc/network/interfaces and add the following definition there at the end of the file.
auto vpn0
iface vpn0 inet manual
    pre-up /sbin/ip link add vpn0 type dummy
    up /sbin/ip link set vpn0 address 00:22:22:ff:ff:ff
    up ip addr add 10.0.0.1/24 dev vpn0
You can change the mac-address as you like as well as the interface name vpn0 and the subnet of course.
Now reboot the server in order for the changes to take effect.
Preparing the Sophos UTM
Now that we successfully configured the Debian server, let us quickly configure the UTM. This is much shorter.
At first, go to Site-to-Site VPN and the IPSec sub-menu. We will configure everything here.
Now go to Policies and add a new Policy there called Debian VPN or whatever you like. And then configure the settings that we defined above.
Save this and continue in the Remote Gateway tab. Here, add our Debian server Gateway as follows.
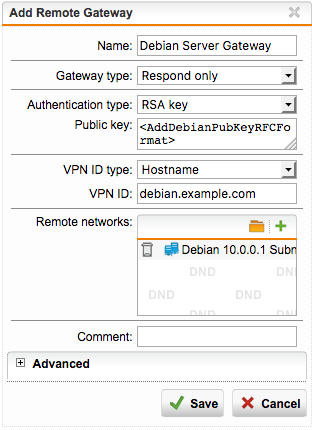
The RSA Key format that you need to enter here is Base64 RFC 3110 again. You can use the rsa-converter from above. Simply run the following command to get the right key format for copy and paste.
/tmp/rsa-converter/rsa-converter -r < /etc/ipsec.d/rsa/public.pem
Also set the right hostname that you configured above and add the subnet as well.
Save that and skip to the Connections tab to complete our VPN.
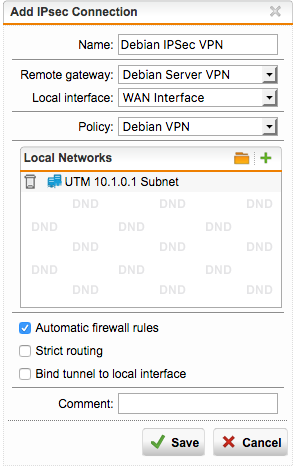
Simply add the configured Policy, Remote Gateway and the WAN interface here as well as the Subnet on the UTM side. Tick on Automatic firewall rules to also allow the connections between both subnets.
Enable the VPN on both sides
Now just enable the VPN on the UTM side. It will now listen for incoming connection attempts. Then go to our Debian server and enable the VPN here as well with the following command.
service ipsec restart
The VPN should connect within seconds and you can check the status with
ipsec statusall
Now check the ping from each side of the VPN to be sure that everything works.
Conclusion
For me it was a bit hard to manually configure an IPSec connection for the first time and then also with RSA keys as well but at the end it worked just fine and quite stable.
Now you can just let stuff listen on this dummy interface and reach it from behind the UTM for example.